Originally written up at https://www.reddit.com/r/BikeMechanics/comments/gkqiwl/figured_out_the_shimano_linkage_derailleur_design/
It annoyed me that I had this derailleur (FD-R8000) set up but didn’t quite understand how it worked. Here’s what I noticed, if anybody else is confused. Short version: The H screw sets cage position on top of the cable tension. It is not a limit screw. This also applies to the other series with the same design (FD-R9100, FD-R7000, FD-5801).
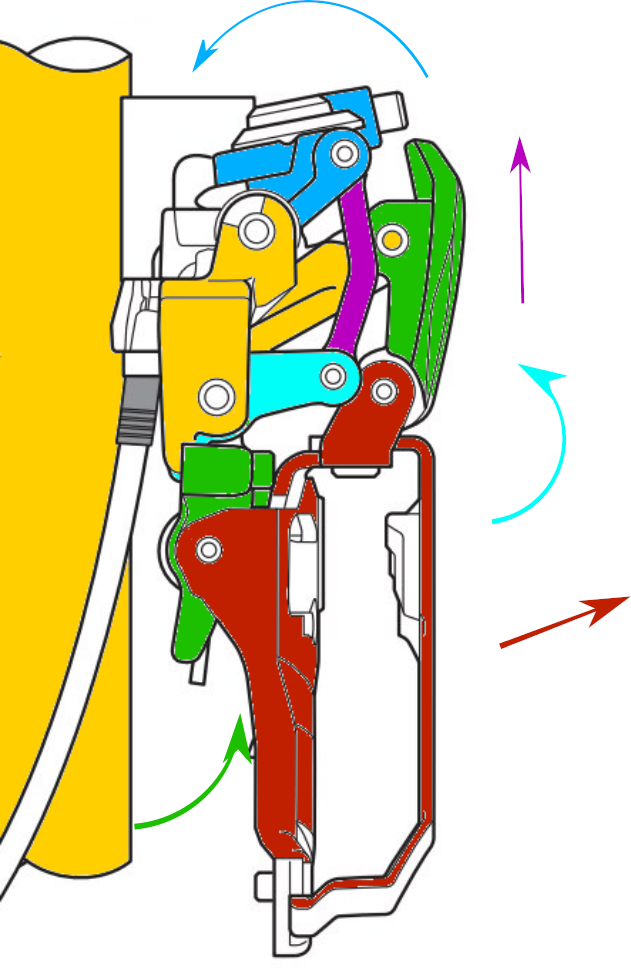
This is an annotated version of an image from the Shimano manual. Yellow sections are rigid and don’t move. Arrows point in the direction of movement as the cable gets pulled. The cable pulls the block at the top (blue) which lifts the arm (purple) which rotates the lower linkage upwards (turquoise). This pushes the 2nd lower linkage (green, bottom) which pushes the cage out. The upper green section is attached to the cage to keep it straight. Note that the pivot for the lower green link is hidden. It’s the large pivot right next to the cable ferrule, shared with the turquoise link.
H screw (cage position)
The key trick is that the lower green section is pushed by the turquoise linkage through the high limit screw (not actually a limit screw). Note how advancing the screw lets the cable clamp rotate clockwise (reducing cable tension) while pushing the cage outwards (would be equivalent to increased cable tension). The L screw is a regular L screw.
This is how you get to the Shimano procedure. Ignoring the cage position, set the cable tension first to make sure the travel and leverage occur in the right part of the cable travel. Use the H screw to set the cage position, because it’s the sum of the H screw and the cable tension. Then set the L screw so the chain doesn’t get dumped onto the bottom bracket shell.
This leads to a trick during setup that I used without understanding it. With the cable released, either retract the L screw or advance the H screw (cage away from the frame), clamp the cable, then reset the adjustment screw. That will give you a little more starting tension so you don’t run out of range on the actual tension adjuster.
L screw (low limit)